Wednesday, 27 May 2015

Reflection On This Adventure Part 2


Technical Issues

Fortunately there were no technical issues encountered with this project. The only issue i discovered was a user interface flaw. It needed a navigation bar and so i provided one, linking the posts in correct order so users can easily browse through my tutorial learning efficiently.

Teaching and Learning Effectiveness 

I believe my blog tutorial has covered many styles of teaching and learning, I have included written information, video, the program used requires interaction because of what it is. I also have images and and a final assessment which includes every aspect covered in the tutorial.

Project Plan

I have adhered to the plan in the sense of following the structure in which i completed the parts of the tutorial. This is because all the sections are prerequisites for the next. The project plan was not followed in terms of completion date. Some of them were late which put pressure on the rest of the project so i had to ensure the rest of the sections received the same dedication along with the layout, look and content as the rest of the tutorial.

Improvements

There are massive improvements i could make to this tutorial. Some of them i will do. The ones i will do is keep this tutorial going, the more content the more audience and more interest if i cover more aspects and go into further detail. I will continue to expand on this tutorial, covering more complex aspects of this game. I hope the frequent viewers of this blog will follow me with my journey as i want to delve into other areas of blogging too. I have recently come across my video game creation software and i have found an enourmous amount of material. I have enjoyed blogging so much that i would like to do it as a hobby and share everything i learn with anyone thats interested. Thank you for reading, Its been an awesome experience.

Thanks so much
Mitch

Links to my Youtube and Twitter accounts

Youtube. https://www.youtube.com/channel/UCiAwM8hyLSH5rMNYtGoYwuA?view_as=public

Twitter. https://twitter.com/mangyhyper

Reflection On This Adventure Part 1


Personal Learning & Reflection.

Weekly Reflections.

I have compiled all my weekly learning and reflections into the below section

So iv'e learnt a massive amount while creating this blog. I want to go over those aspects. Firstly i have learnt that little things can make big differences. Like with YouTube creating a simple thumbnail can increase views and subscribers. I have included thumbnails and cover photos for all the blog entries, this entices the user to view, it also makes the blog look tidy and professional.

Changes Made.

The only change i have made for the project is by not including the Wiki page on top of the blog and videos materials. There are two reasons for this, the first reason is because of time restraints, it was a large amount of information that had to be considered and realistically wastn feasible in the given time-frame. The second reason is because the videos included address many of these topics and includes far more learning styles rather than simple writing. I have sufficient material written in my blog posts on the given subject.

Ethical and Accessibility Issues.

Project Ethical Issues

There are several ethical issues surrounding my project, i will address a few. Firstly the main one is piracy. I could have easily pirated Kerbal Space Program in form of a torrent. This instantly encourages the use of the game from my blog but i also immediately destroy it by not supporting the company. The creators of this game are whats called Indie developers. this means they are independent from major publishing companies. This makes it difficult for these companies to make a budget if their software is not supported. It is extremely important to always support indie teams and the work they do.

Another ethical issue surrounding the project is the use of Kerbal space program within my tutorial, i may have been required to ask for permission to use their photos, artwork or other material, though i don't think this is the case. Me creating this tutorial actually markets the game further and may increase potential customers to Kerbal Space Program


Accessibility Issues

Accessibility Issues can include bad reception, Good reception to online material is extremely important, there is no point in creating online material for the masses to use if they dont know how to get it. I have been addressing this issue by linking social media and self promotion techniques to ensure that anyone can access it. I have firstly used twitter to promote my latest blog entries hash-tagging the Kerbal space program community #KSP. also directly to their page. I have also shared with the public community on Google+ amd creating Youtube videos directly linking back to the blog.

Graph of most popular countries among blog viewers
EntryPageviews
New Zealand
87
United States
75
Canada
13
Italy
12
Germany
10
United Kingdom
6
Australia
3
South Africa
3
Poland
1

Pageviews by Browsers

EntryPageviews
Chrome
151 (69%)
Firefox
38 (17%)
Internet Explorer
11 (5%)
Mobile Safari
10 (4%)
Safari
3 (1%)
Maxthon
2 (<1%)
SamsungBrowser
1 (<1%)
Image displaying most popular browsers

Pageviews by Operating Systems

EntryPageviews
Windows
138 (63%)
Android
44 (20%)
Macintosh
32 (14%)
Linux
2 (<1%)
Image displaying most popular platforms
As you can see by above, my blog is accessible on every platform on every browser. What is interesting is that i have a substantial amount of views from Italy. Because i have used Google Translate gadget within my blog, my blog is now view-able to every country in the world. This ensures there is no language barriers.


Technology & Technical Learning


Technology Map

Because logger wont let me use arrows or anything to directly tell you how it works, ill explain it. Blogger is where the content is. It is directly linked to my Google Plus account. Because i have implemented my Youtube Videos on my channel directly,  any views on the video while on the blog will increase views to the channel and increase awareness. Sharing on twitter when the post or blog is shared is also done automatically.


My Personal Mission


Thanks Everybody!

Hey to everyone who has followed this blog from the beginning, its really awesome and i appreciate everything you have read and taken in, it means a massive amount to me. Please share this with anyone who might be interested, i know i'm no Scott Manley, but i have a massive passion for this game, and i find that i have learnt so much about the laws of physics and appreciating spaceflight and how difficult it can be. I also would hope that this blog finds more of an American audience.

I love that my own country is viewing my gaming blogs, and every other individual from their own country, I want to share this blog with the world, so let your friends know if they play KSP, because come on, we should all be playing this game.


This is it.

Now for my personal mission i want something cool, what i want you to do is to get into a 300km orbit around the earth. Thats the easy part. What i want to see is ONE maneuver node that fly's by the mun slingshots around Minmus back to earth, with a periapsis of below 50km on the return. This is to be a fly by trajectory changing sphere of influence for all moons orbiting the earth. Remember, ONE maneuver, show me your screenshots, Ill do the challenge too and post what i get.

Good Luck!

Terminology

Almost Done!


Trajectory

A trajectory is the path that a moving object follows through space as a function of time.

Velocity

Rate of change of the position. It is the combination of speed with the direction. Velocity is a vector, measured in meters per second (m/s).

Sphere of influence

The radius around a celestial body within which its gravity well is non-negligible. Commonly known as SoI/SOI.

Delta-v (Δv)

The change in velocity that has or can be exerted by the spacecraft. This is measured in meters per second (m/s). More mass can reduce the delta-v, while more propulsion can increase it. This makes it a useful value to calculate the effectiveness of launch vehicles. For example, a launch vehicle requires about 4,500 m/s of delta-v to escape Kerbin's atmosphere and achieve a stable orbit.

Retroburn

A burn performed "backwards", e.g. with the engines facing towards prograde and nose towards retrogade (hence the name).

Burn

firing of the engines, usually to alter trajectory in some way.


Peri-* and Apo-*

When speaking of orbits, oftentimes the words "periapsis" and "apoapsis" will be modified to specify which planet or moon the orbit is around. For example, -kee and -kerb are both commonly used to describe orbits around Kerbin, resulting Perikee/Perikerb and Apokee/Apokerb.


Lateral Velocity and Landing


Nice & Slow

In this section of the tutorial i will cover lateral velocity and landing.
Firstly we need to understand what lateral velocity is. Lateral velocity is the speed you are coming in on a lateral plane, or sideways speed. Because you are coming in of an orbital trajectory (or not) you gain lateral velocity. For a spacecraft to be able to successfully land in a vertical manner, all lateral velocity must me killed.

Touchdown

its quite simple to lateral velocity, point yourself at the retrograde marker and burn slowly, you will notice your navball start moving from a lateral/horizontal plane to a more vertical plane. Be sure to watch your orbital speed, ensure it is under 300m/s.

Once your prograde marker is at polar position, your lateral velocity is killed, When landing ensure your speed is nice and low and try to land on a nice flat area (it can create complications)

The video will show you how i kill my lateral velocity and land on Minmus, so do enjoy folks! 


Planetary Transfer Orbits


Slightly Complicated.

If you have been following my tutorial by now you should be sitting pretty in a nice stable orbit above Kerbin. This is where the complicated parts come in. What we aim to do in this tutorial is to get ourselves into an orbit around the Minmus (Moon). This is not as simple as pointing the spacecraft at the moon and flying there, it requires the pilot to understand phase angles which i will touch on very briefly for this tutorial.

Disclaimer.

There are many ways to perform orbital transfers so do not think that this is the only way to do it, i will discuss a couple of ways to perform orbital transfers, efficient and inefficient.

Goodbye Kerbin!

Now this is where the game becomes very cool, After this video tutorial you will be closer to the moon than the earth. The though is exciting isnt it!? So once in our obit what we want to do is to burn toward the planet we are aiming at. With a catch. We don't just burn towards it we have to perform a manuveor so that we burn and by the end of it we will be in the moons sphere of influence. To do this we have to predict where the planet will be by the time we start coming back down to Kerbin.This is done with phase angles, but i will explain that in the video, The reason for the lack on content in writing is because there is so much to explain and is simply easier in video so without further waiting, Enjoy!


Tuesday, 26 May 2015

Stable Orbits


Nice and Simple.

Well after the last video you should now be able to build a rocket, use the basic mathematical equations to ensure the rocket is efficient and launch the rocket properly with the use of the gravity turn. Congratulations you have successfully launched your craft on to a sub-orbital flight path.

Fine Tuning.

Now that your vessel is on a sub orbital flight path, we want to get it into a stable orbit. We are going to burn pro-grade at our flight path apoapsis. The icon looks like this;

Pointing at this marker at the flight path apoapsis will increase and circularise the orbit. This basically makes the orbit bigger. Pointing the ship at the retrograde vector will decrease the orbit (because you are thrusting backwards, which will slow you down)The retrograde marker looks like the picture below.

The icons are similar to each other but mean very different things.


A Perfect Circle.

From the get-go i want to teach the viewers how to get a a very accurate orbit. I personally do this because i am picky and i like my orbits fine tuned. It also makes life easier for orbital rendezvous.
This is difficult to explain and the video will explain it better, but i will do my best to put words on the page.

Let's say that you have an orbit of 120,000km by 150,000km. There are two things you can do to make these equal. The first is by burning pro-grade at the point of the orbit that sits at 150km this will increase the 120km because you are thrusting forward. This will increase dependent on how much thrust you use but will eventually reach 150,000km and exceed that height if the engines are not stopped.

The second way is to burn retrograde at the 120km point of the orbit to slow down. This will decrease the 150,000km.

I hope that makes sense, below is a video of me circularising  an orbit around Kerbin to help viewers who just want to see it done. Enjoy!


Monday, 25 May 2015

Rocket Launch & Gravity Turn


Ten meters per second squared!

Sorry Guys!

Firstly i would like to apologise to my viewers and readers for the lack of content the last couple of weeks. I've been a bit spaced out....  ;)

Side Flight

Alright, so currently what we have done is built a semi-advanced rocket that can reach space quite easily. Now what we want to is to understand the initial launch and gravity turn.
The gravity is extremely important in space flight for two reasons. The first reason the gravity turn is so important because it is fuel efficient. This efficiency directly relates to the thrust to weight ratio, as the ship ascends the fuel is being consumed at the same time, putting the ship on a 45 degree angle offers less resistance from aerodynamics and in turn allows the rocket to fight the forces of gravity at a more efficient rate.

What Goes Up.

Now there is a downside to how you approach the gravity turn. We all know what the prograde vector looks like now, now one option is to follow the prograde once above 10km to an almost horizontal flight path, what this will do will have a much slower approach to the safe 70km space zone, but will require much less thrust to reach a stable orbit on you periapsis. This can be made even more efficient by using an engine that uses much less fuel in a vacuum once the 70km apoapsis is reached.

Must Come Down.

The other approach is quite simple, just the reverse. What you do is once the 10km mark on the 45 degree angle is reached is to stay locked on the 45 degree vector. This will get the rocket to the 70km mark significantly faster, but will result in a much more lengthy burn to circularise that orbit. The sweet spot is finding the vector that is inbetween both of these approaches. That is the most efficient way to launch, but can prove extemely tricky to master. Watch the video below to get a more in-depth understanding.


Friday, 8 May 2015

Building Efficiency and Math


Lets Do The Math!

In this section of the blog i will be going over the the math and equations needed for space flight. What will be discussed is the thrust to weight ratio, how the equation works and how simple it is to build an efficient rocket following these steps.


Basically, it's the result of dividing your thrust (in newtons) by your weight (in kilograms times acceleration, i.e. kg*m/s², so... well, also in newtons). Thrust is what gets you up, weight is what keeps you down. And if thrust > weight, i.e. if your thrust-weight ratio is more than 1, you go up. If thrust < weight, you can put your engines into overdrive and you won't move an inch. For the record, the Saturn V first stage rocket engine had a TWR of 94.1. In other words, it could have lifted itself over 94 times. Beat that!
What does that mean for our space vehicle? Basically, it means that whatever we put as rockets behind our craft, it has to overcome the total weight of the craft. Which also means that, if you have multiple stages, the upper stages are just dead weight at start. Yes, yes, there are rockets in there and they might have a lot of punch, but they do not add to the thrust at start. Thrust is always only the thrust you ACTUALLY apply, not the thrust your rocket can eventually do in total.

Note that every rocket engine has a TWR of more than one. By definition. Engines below a TWR of 1 need some kind of aerodynamics on the craft to get it off the ground. The question is, though, whether the dead weight sitting on top of it STILL keeps that equation above 1. The F1's 94.1 TWR doesn't mean that the Apollo craft got shot into orbit at 100g. It means that there was a friggin' HUGE rocket sitting on top of that engine and hence it could barely get the whole behemoth up into an orbit!
My guess is that Kerbin has a gravity of about 10 m/s² (much like earth), meaning that a rocket engine rated at 200 max thrust (like the non-gimballed stock engine) can lift 20 units of mass (or 8 stock liquid fuel tanks). Given that a rocket of 1 stock command center, 7 fuel tanks and 1 engine (totalling a mass of 20.5, 7*2.5+2+1) can't get off the ground but with 6 fuel tanks it can, I'd say that should be about right. So when building your rocket, always add up the mass of the parts you assembled, multiply by 10, then divide by the thrust of the engines, but ONLY the engines that actually thrust. The more you get out of that, the faster your rocket will climb. Considering that engines seem to overheat more readily if they're operated at the TWR limit, try to get to a TWR of at least 1.7 in your first stage. My Mun rocket has a first stage TWR of 2.2, which is plenty but not overdoing it to the point where the g-forces become unmanageable.
Also, keep in mind that you will use up fuel as you climb. Your fuel tanks will get emptier with every second your engine fires, making them lighter, meaning, less weight has to be lifted. Plus, gravity decreases with distance squared, which also makes the pull of Kerbin less and less with every inch you climb. Not as much as one would wish, though.

Advanced Rocket Design


Congratulations!

Well done! you have successfully launched a rocket into the atmosphere. That's not all though, in this part we will create a more complex rocket that has multiple engines that will help us reach much higher altitudes and into space!


Bigger and Better

Now that you have launched a basic rocket, lets make it bigger and more complicated!
The parts used are as follows:

2x RT-10 Solid Fuel Boosters
2x FL-T800 Liquid Fuel Tanks
2x TT-38K Radial Decoupler
2x TR-18A Stack Decoupler
1x LV-T45 Liquid Fuel Engine
1x Mk 1 Command Pod
1x Mk 16 Parachute

The Rocket should be set up as seen below.


Below is the build video for the advanced
rocket design with the launch included.


https://www.youtube.com/watch?v=Sq8ddoQuiq8&list=PLaztmMOdP1dZcHSGen8mDRu6bol6y-PRS&index=2

Basic Rocket Design


Welcome to the first part of the KSP How to. Firstly we are going to go straight into basic rockets. Throughout this tutorial there will only be rocket based spaceflight tutorial. Planes will NOT be covered.

The type of game that should be chosen is sandbox or career. Follow the on screen instructions to find the rocket building hangar. This is where the fun begins!


The Hanger 

The hanger is where it all happens! Within this building it is possible to build absurdly massive, heavy craft to do amazing things. Below is an image from the rocket building hangar. It is an image of all the parts involved with building a rocket. I will list the different categories that they are split into.

The first one selected is Pods.

  • Fuel Tanks
  • Engine
  • Command and Control
  • Structural
  • Aerodynamic
  • Utility
  • Science

  • (Not Applicable, Mod)

A little info

All these components hold some constant attributes. They are usually; Mass, Crash tolerance and maximum temperature.

  • Mass: How much the object weighs. Measured in ton decimals. eg; 0.5 = Half Tonne
  • Crash Tolerance: At what maximum speed the object can collide into a surface and survive. eg; 1.2 m/s
  • Maximum Temperature: At what temperature the object can survive on reentry


Try This


I have selected the Mk1 Command Pod and the RT-10 Solid Fuel Booster. Try these two components.


If you want to save your new rocket you can name it at the top of the screen with the bar name "Untitled Space Craft"


Once you have named your ship we can now save it and launch it at the top right of the screen using the save icon and the launch icon


Save:Dark Blue
Green: Launch
Teal: New Ship
Yellow: Load Ship
Red: Exit


Liftoff

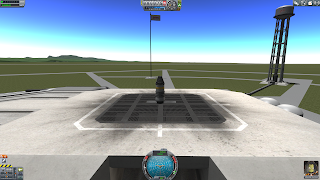
Once you hit the launch button you and your rocket will be moved outside onto the launch pad as so.
From here all you need to do before you launch your vessel is press the "T" key. This enables S.A.S. It is an inbuilt device into cockpits and probes that help keep them stable and on course, though it doesn't do it all for you!


Now all you have to do is press the space-bar. Watch your navigation ball to get your speed and your altimeter to see how high you are traveling.


And Have Fun!
Link to the Video: